Change data capture (CDC) is a technique to observe and capture changes in databases like MongoDB. It's particularly useful for monitoring changes such as insertions, updates, and deletions in real time. Once detected, these data modifications can be transformed into a continuous stream of change events, which you can integrate into various systems and applications for further processing.
CDC is utilized in many different fields and applications because its real-time data synchronization and analysis ensure that the systems have access to the latest information and data. For example, in event-driven architectures such as microservices, CDC is a useful component for data exchange between microservices. It also enables real-time updating of materialized views within these architectures. In data warehouses, CDC can be used to capture data changes in different source systems and use this information to keep the data warehouse up to date. For cache invalidation, CDC can track modifications to data in order to keep cached data consistent. CDC is also very useful in audit logging. It can document every data modification and keep a comprehensive record of transactions, which is important for compliance and security.
In this article, you'll learn about the importance of CDC, become familiar with some of its use cases, and explore how you can implement CDC with a MongoDB database.
How to Implement CDC with MongoDB
Implementing CDC with MongoDB can be accomplished using several different tools and techniques. The following sections will discuss several prominent solutions, including using Debezium, MongoDB CDC handlers, Qlik Replicate CDC, and Airbyte CDC.
Debezium
Debezium is an open-source platform that allows users to perform CDC with MongoDB. Debezium establishes a direct connection to the MongoDB database to monitor document-level changes like inserts, updates, and deletes. Debezium checks the operations log (oplog) in MongoDB for any modifications to the data. The detected data changes are then streamed to a Kafka topic. Implementing Debezium with MongoDB involves configuring the Debezium connector to tap into MongoDB's operations log and setting up all necessary configurations for integration with Kafka.
MongoDB CDC Handlers
Another option for performing CDC with MongoDB is to use the MongoDB CDC handlers. This involves streaming change events from MongoDB to a Kafka topic using the MongoDB Kafka Connector. To implement CDC using this method, you'll need to configure source and sink connectors. The source connector captures data changes in the MongoDB collection and streams them to a Kafka topic. The sink connector then consumes these messages and applies the changes to the target MongoDB collection. This process ensures data consistency across different collections.
MongoDB Atlas users also have the option of using the MongoDB Atlas Source Connector for Confluent Cloud to establish a fully managed solution for CDC with Kafka. This connector specifically targets MongoDB Atlas databases and automatically captures and publishes change events to Kafka topics, thus providing an efficient way to integrate MongoDB Atlas with Kafka to perform CDC.
Fivetran
Fivetran is a data integration tool that supports CDC. It is able to capture and replicate data changes from a source database such as MongoDB to a variety of target systems or platforms. To set up MongoDB for CDC using Fivetran, you must configure a new connector in the Fivetran dashboard, where MongoDB is selected as the source. Additionally, you have to specify which databases and collections should be monitored for changes and how these changes should be captured and replicated. This includes setting the synchronization frequency and determining how much historical data should be captured.
Airbyte CDC
Airbyte offers another alternative to enable CDC with MongoDB. Airbyte is an open source data integration platform that can extract data from a source system (like a MongoDB database) and load it into a target system (like a data warehouse or another database). This process involves configuring MongoDB as the data source and selecting a target system, such as a data warehouse, where the captured changes will be streamed.
Airbyte then tracks the oplog of the MongoDB database for data modifications. As soon as a modification is captured in the source system, Airbyte streams the change event to the target system.
Use Cases for CDC with Debezium and MongoDB
Debezium is a CDC platform that enables the synchronization of data across various systems by detecting and streaming real-time changes from databases like MongoDB. Using Debezium, organizations can implement efficient CDC in a wide range of different use cases, including:
- Microservices: In the context of microservices, Debezium can be used to observe changes in the MongoDB database of a microservice. Consider a customer support system where a new support ticket is created. Debezium captures this data change and streams it to a predefined Kafka topic. Other microservices subscribed to this topic are then informed of this change event and can update their internal data states or initiate certain actions based on the change. This ensures data consistency across microservices without the need for direct communication between them. This method is known as the outbox pattern.
- Data warehouses: By capturing changes in operational databases, such as patient records in a healthcare provider's MongoDB database, Debezium ensures that data warehouses remain synchronized with the latest updates, like new patient entries.
- Cache validation: For systems that require high responsiveness, like a content management system that caches data in Redis, Debezium can help to keep the cache updated by detecting and streaming database changes. This ensures that users access only the most current information.
- Audit logging: In environments where it's important to track data modifications for compliance, such as banking transactions, Debezium provides a mechanism to monitor and record all changes made to the data. This creates a comprehensive audit trail for enhanced security and compliance.
- Analytics: Debezium can enhance analytics by providing a real-time data feed into analytical platforms such as Propel. For example, in e-commerce, user interactions with products stored in MongoDB can be tracked and streamed to an analytics platform. This would allow you to perform immediate analysis of consumer behavior and their preferences to get a deeper understanding of customer dynamics. As a result, this would enable organizations to better adjust their strategies and enhance user experiences based on fresh insights.
Implementing CDC with MongoDB
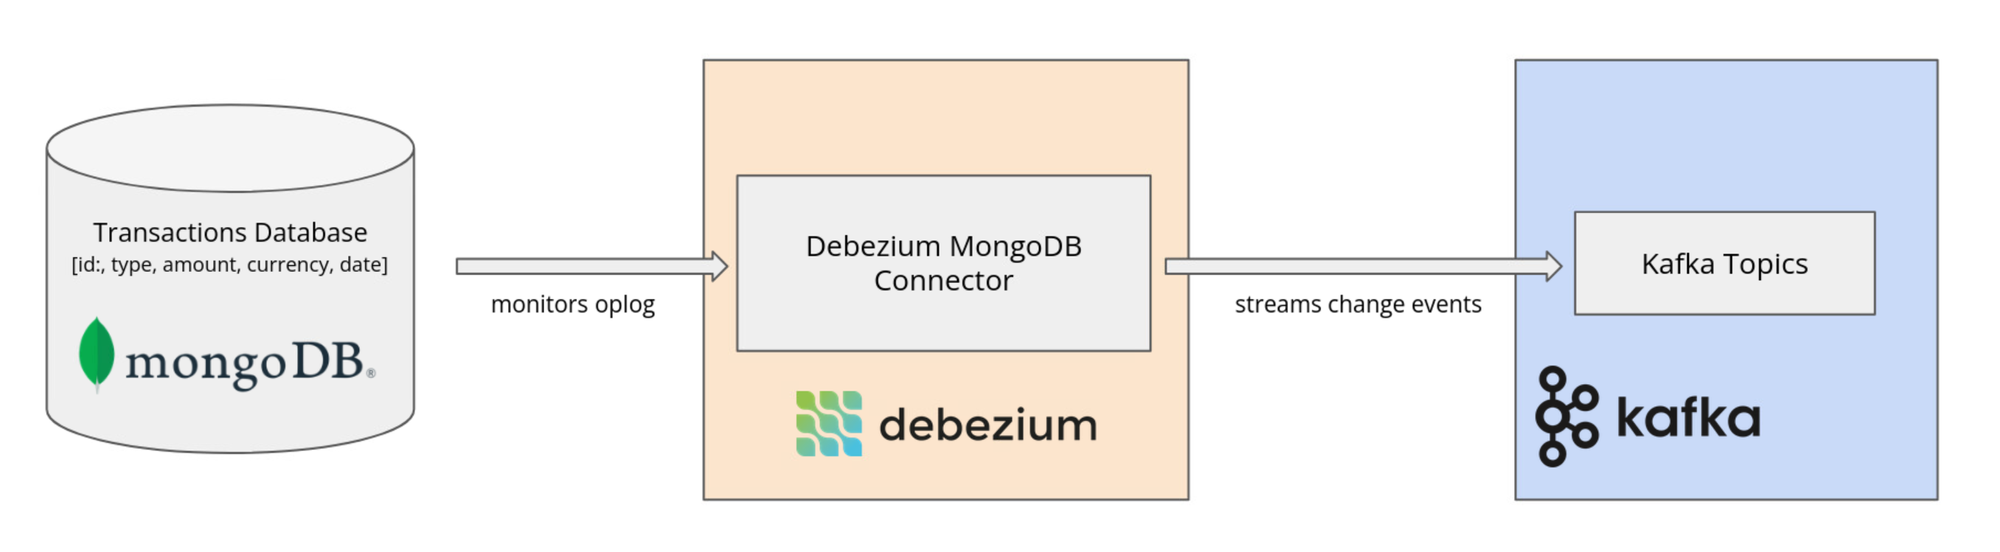
To illustrate how to implement CDC with MongoDB, imagine you're part of the IT or data management team at a financial institution that uses MongoDB to store all data related to transactions, account balance adjustments, and customer profile updates. Until recently, the lack of real-time data capture caused difficulties in generating an audit trail for compliance or security purposes. This resulted in delayed insights and potential gaps in monitoring data changes. Your task is to employ Debezium to implement CDC, which connects to the MongoDB <span class="code-exp">banking</span> database and monitors changes within it. For example, when a transaction is processed, or an account balance is updated in the <span class='code-exp">transactions</span> collection of the <span class="code-exp">banking</span> database, Debezium should capture these changes in real-time and stream these events to Kafka.
The technical architecture requires setting up a Debezium MongoDB connector for the relevant collections in the MongoDB database. This connector then listens for changes in the oplog of MongoDB and captures any data modifications.
A rough architecture diagram of the application is illustrated below:
Prerequisites
To get started, you'll need the following:
- A recent version of Docker (this article uses Docker 24.0.7)
- A recent version of Docker Compose (this article uses Docker Compose 1.29.2)
- ZooKeeper
- Kafka
- Kafka Connect
- Debezium's MongoDB connector (this article uses connector version 0.9.4)
- A running instance of a MongoDB database
Starting Kafka and Debezium's MongoDB Connector
First, you'll need to download Debezium's MongoDB connector. The connector monitors a replica set or a sharded cluster of MongoDB for any data changes in the databases and collections. These changes are then recorded as events in Kafka topics. In particular, the Debezium MongoDB connector uses the oplog of MongoDB to detect the data changes.
Download version 0.9.4 of Debezium's MongoDB connector and extract the folder into the directory <span class="code-exp">PROJECT_DIR/kafka-connect/plugins</span>, where <span class="code-exp">PROJECT_DIR</span> is the main directory of your project.
In the next step, you can start the Kafka services and the Debezium connector. The most convenient and efficient way to deploy and manage this stack is through the use of Docker and Docker Compose. Download the <span class="code-exp">docker-compose.yml</span> file and save it in <span class="code-exp">PROJECT_DIR</span>. Then, open a terminal in this directory and run the following command:
In the terminal, you should see that the Kafka services have started:
To confirm that Debezium's MongoDB connector is installed correctly and is picked up by the plugin loader, run the following command in the terminal:
If it's been installed successfully, you'll see the following output in the terminal:
Setting Up MongoDB Using Docker
If you don't have a native installation of MongoDB, you can follow the instructions in this section to launch MongoDB in a Docker container.
In a new terminal, execute the command below to pull a Docker image for MongoDB:
Next, in the same terminal, run the container with the command below, where <span class="code-exp">mongodb-1</span> specifies the name of the container:
Here,<span class="code-exp">--replSet debezium</span> is passed as an argument to the MongoDB instance. This tells MongoDB to initiate itself as a member of a replica set named <span class="code-exp">debezium</span>.
You also need to configure the running container, but you'll first need to execute the following command in your terminal to get access to run commands inside the Docker container:
Once inside the container, execute <span class="code-exp">mongosh</span> to start a <span class="code-exp">mongosh</span> process. You should get the following output:
Now, execute the command below within the <span class="code-exp">mongosh</span> process to configure the running MongoDB instance as a member of a replica set:
MongoDB is now configured to be a member of a replica set named <span class="code-exp">debezium</span> with a single member (itself) at the specified host and port. After initiating the replica set with this command, the MongoDB instance starts behaving as part of a replica set. It's ready to replicate data to any additional members that might be added or to support operations that require a replica set, such as data change streams.
You can now create a user profile for the MongoDB instance. Inside the <span class="code-exp">mongosh</span> process, execute the command below to create a user, role, and password:
Next, create a database and a collection within MongoDB by running the following command in the <span class="code-exp">mongosh</span> process:
This command creates a database called <span class="code-exp">banking</span> and a collection named <span class="code-exp">transactions</span>. It also inserts a new transaction record into the collection.
You can execute the command <span class="code-exp">db.transactions.find().pretty()</span> in the same <span class="code-exp">mongosh</span> process to verify that the database was created successfully. If it was successful, you should see the following output:
Starting the Debezium MongoDB Connector
To provide Kafka Connect with the necessary configuration to instantiate and run the connector as a task within the cluster, you must first create a configuration file at <span class="code-exp">register-mongodb.json</span> to store the following connector configurations:
Each attribute within the <span class="code-exp">config</span> object specifies how the connector should operate:
- <span class="code-exp">connector.class</span> specifies the class of the connector to be used (in this case, <span class="code-exp">
io.debezium.connector.mongodb.MongoDbConnector)</span>. - <span class="code-exp">tasks.max</span> defines the maximum number of tasks that the connector should use to perform its work.
- <span class="code-exp">mongodb.hosts</span> lists the MongoDB server or replica set members that the connector will connect to.
- <span class="code-exp">mongodb.name</span> is an identifier for the MongoDB server or replica set that is used internally by Debezium. It labels the origin of the captured changes.
- The <span class="code-exp">mongodb.user</span> and <span class="code-exp">mongodb.password</span> fields contain the credentials that Debezium will use to authenticate with MongoDB.
In the next step, open a new terminal in the directory where <span class="code-exp">register-mongodb.json</span> is saved and execute this command:
If the connector is successfully instantiated, you should see the following output in the terminal:
Starting the Kafka Consumer to Observe the Change Events
You can utilize Kafka to display all captured data changes in the terminal. To do this, you should first open an interactive bash shell inside the running Kafka Docker container. Execute the following command in the terminal:
Once inside the container, execute the following command to start a Kafka consumer that displays all captured data changes in the terminal:
This command tells the Confluent CLI to consume messages from a Kafka topic called <span class="code-exp">dbserver1.banking.transactions</span>. This topic contains change events for the <span class="code-exp">transactions</span> collection in the <span class="code-exp">banking</span> database of the MongoDB server.
To verify that CDC is working, go back to the terminal where the <span class="code-exp">mongosh</span> process is running and insert some new data into the collection:
In the terminal where the consumer is executed, you should see the displayed change event:
Lastly, you can verify that the data in the database is consistent with the changes made. In the terminal with the <span class="code-exp">mongosh</span> process, execute the command below to display the entire <span class="code-exp">transactions</span> collection:
Upon executing the command, you should expect to see the following output:
This output indicates that a new customer was successfully added to the database. It confirms the successful registration of the connector configuration with the Kafka Connect cluster as well as the initiation of data capture from MongoDB, reflecting recent changes such as the addition of a new customer.
Conclusion
In this article, you learned the role change data capture (CDC) plays ensuring data across different systems and applications remains synchronized and up to date. CDC preserves data integrity, enhances decision-making capabilities, and facilitates real-time data analysis and reporting. In the practical part, you focused on deploying CDC within a MongoDB database environment by utilizing Debezium and Kafka.
If you need to power analytics from your MongoDB data, consider exploring Propel. For example, you to directly ingest your MongoDB CDC to a Propel Webhook Data and expose it via low-latency analytics APIs to power dashboards and reports. You can also enrich and transform your MongoDB data for analytics using Propel’s Materialized Views. Think of it as gathering data in one main spot for different uses.
Alternatively, Propel also integrates with ELT platforms like Fivetran and Airbyte, as well as data warehouses like BigQuery and Snowflake. This allows you to ingest data from either of these platforms and then use it to Propel to power customer-facing analytics.