

If you’ve been involved in extensive data analytics projects, you may be familiar with the concept of data lakes. Data lakes serve as centralized and expansive repositories specifically designed to store both structured and unstructured data. Data lakes allow you to store structured and unstructured data at any scale. They can store data from various sources and formats, including text, images, videos, and logs. The data stored in a data lake is typically raw and unprocessed, and it needs to be processed before it can be used for a variety of purposes, such as data mining, analytics, and machine learning.
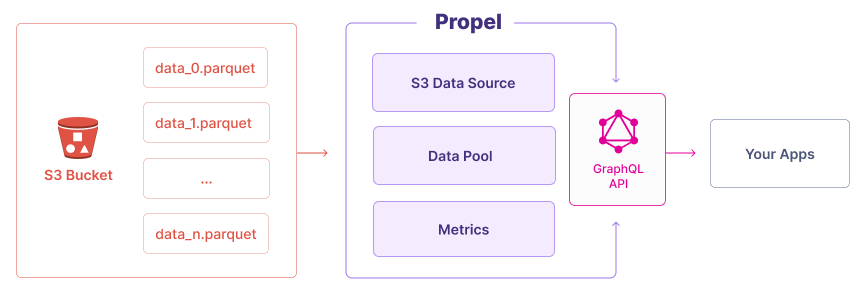
This article explores the process of building high-performance data lake APIs using Amazon S3, Parquet, and Propel. Amazon S3 serves as a flexible storage foundation for a data lake, expanding as the data lake grows. Parquet, a popular format for data storage within data lakes, offers optimized columnar storage for large-scale data processing. It efficiently handles complex data structures, nested fields, and arrays while supporting compression and encoding for cost reduction and improved query performance. Finally, Propel processes Parquet files and provides APIs to create powerful product experiences.
The following diagram shows the architecture combining these technologies:
You’ll learn how to use S3 to store Parquet files, how to use Propel to create APIs based on these files, and how to use Postman to query the GraphQL API to get the data in three different formats (time series, counter, and leaderboard).
To follow along, you can download these Parquet files, which contain sample sales data.
Setting Up S3
You need to follow a few steps to properly set up S3 to be used by Propel:
- Uploading the Parquet files to a bucket
- Creating an IAM policy for accessing the bucket
- Creating an IAM user with the aforementioned policy attached to it
- Generating access keys for the IAM user
Uploading the Parquet Files to S3
The first step is to upload the Parquet files to an S3 bucket. Go to your AWS account and create a new S3 bucket. This example uses all the default options:
.png)
Then, go ahead and upload the Parquet files to the bucket (again, you can use these sample files to follow along):
.png)
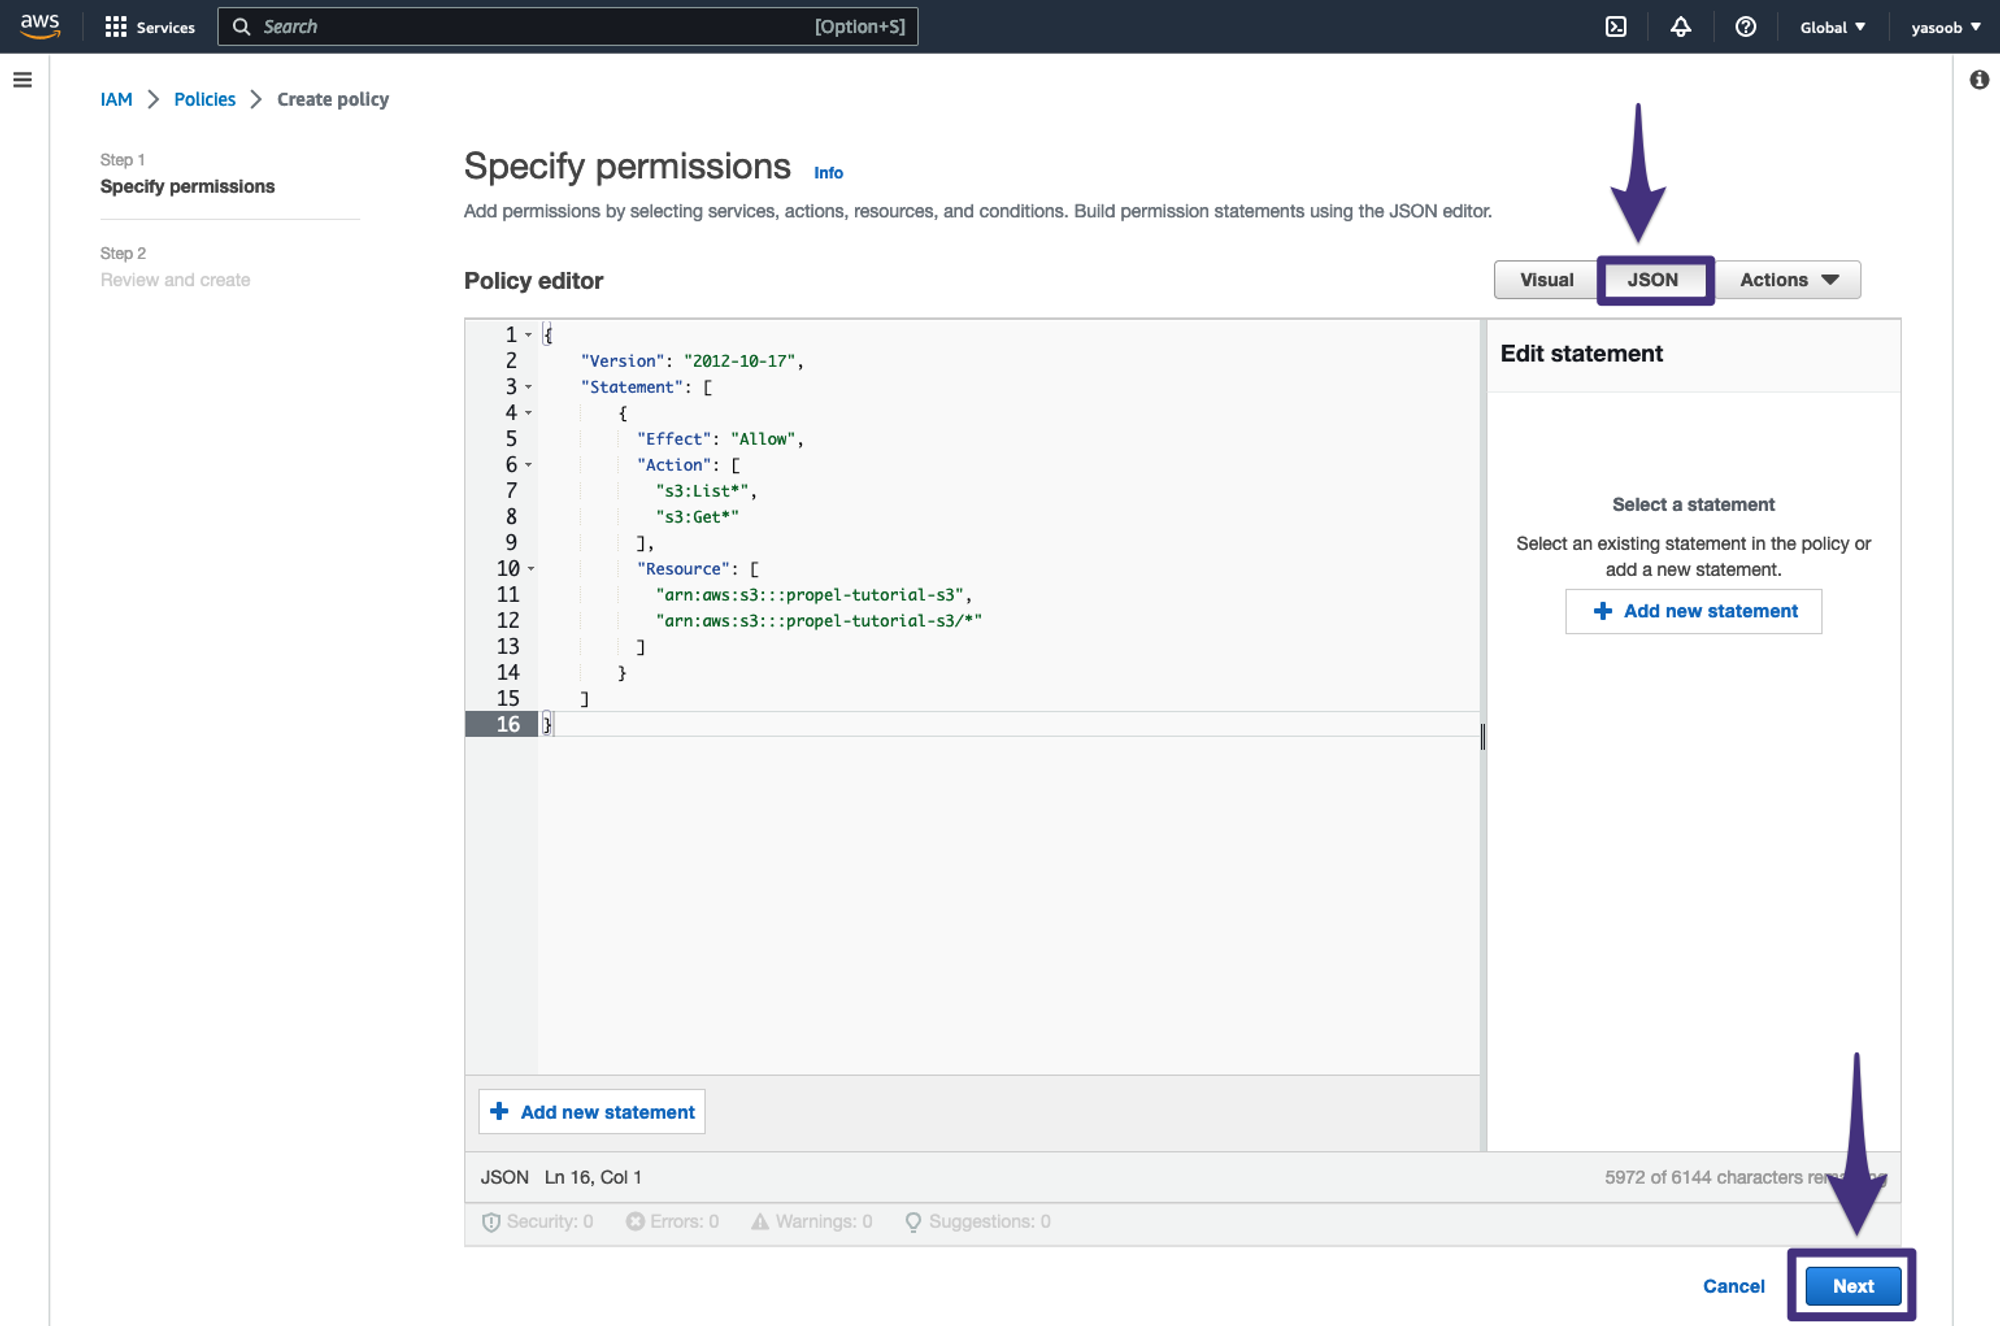
Creating an IAM Policy for Accessing the Bucket
The next step is to create an IAM policy for accessing the bucket. When doing so, you need to make sure the policy is as specific as possible so that only the required data is accessible by Propel. You can create an IAM policy by going to the IAM dashboard on AWS and clicking Create policy on the Policies page:
.png)
This is what the policy will look like:
Replace <YOUR_BUCKET_NAME> with the name of your S3 bucket.
Make sure you go to the JSON policy editor to paste the above policy:
As the last step, review the policy details:
.png)
Once you successfully complete the wizard, the newly created policy should show up in the IAM dashboard:
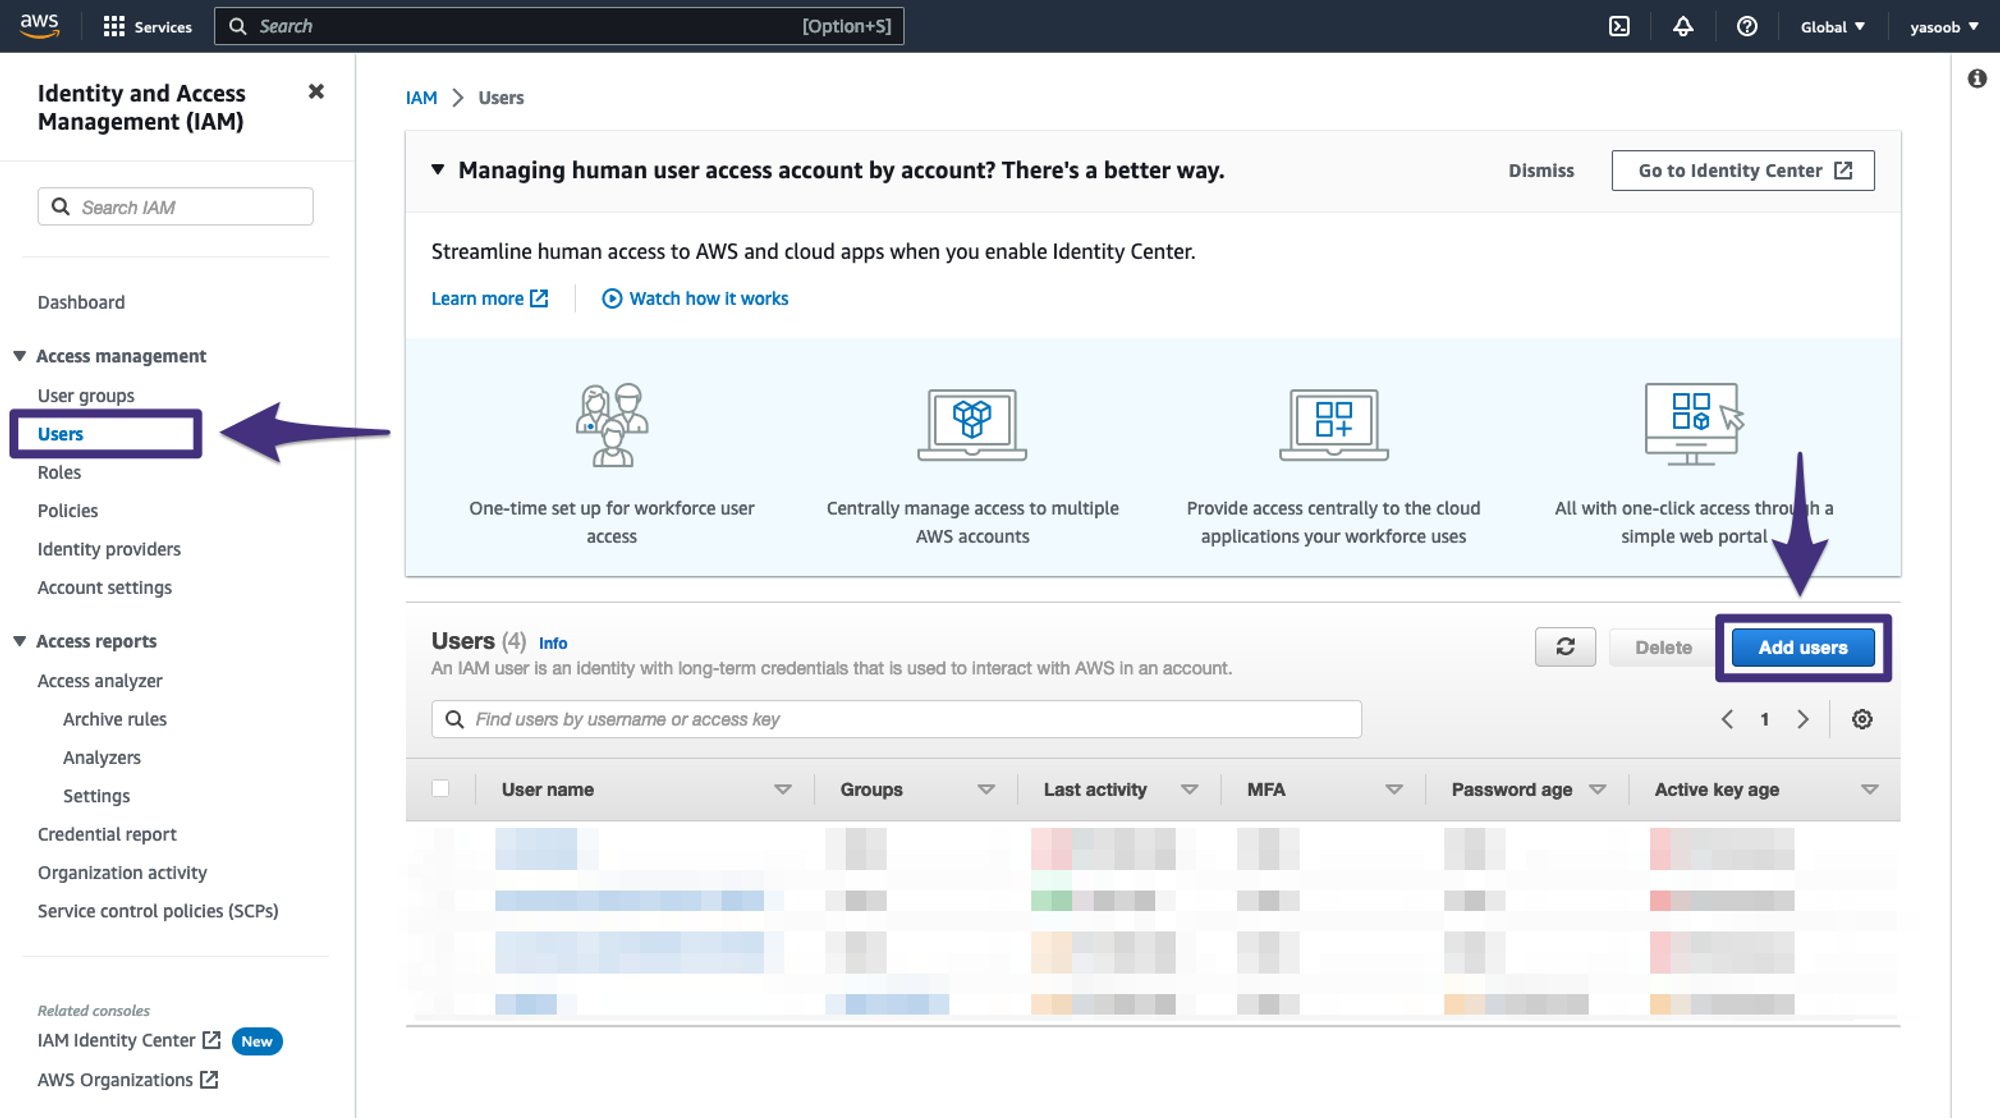
Creating an IAM User
Next, go to the Users section in the IAM dashboard and create a new user with this new policy attached to it.
Click Add users:
Specify the user details and click Next:
.png)
Attach the policy you created in the previous section:
.png)
Review the final details and click Create user:
.png)
If the user creation was successful, it should start showing up in the Users table:
.png)
You’ll provide the credentials of this new user to Propel. The access policy you created in the previous step will ensure that Propel only has access to the S3 bucket via this user and nothing else.
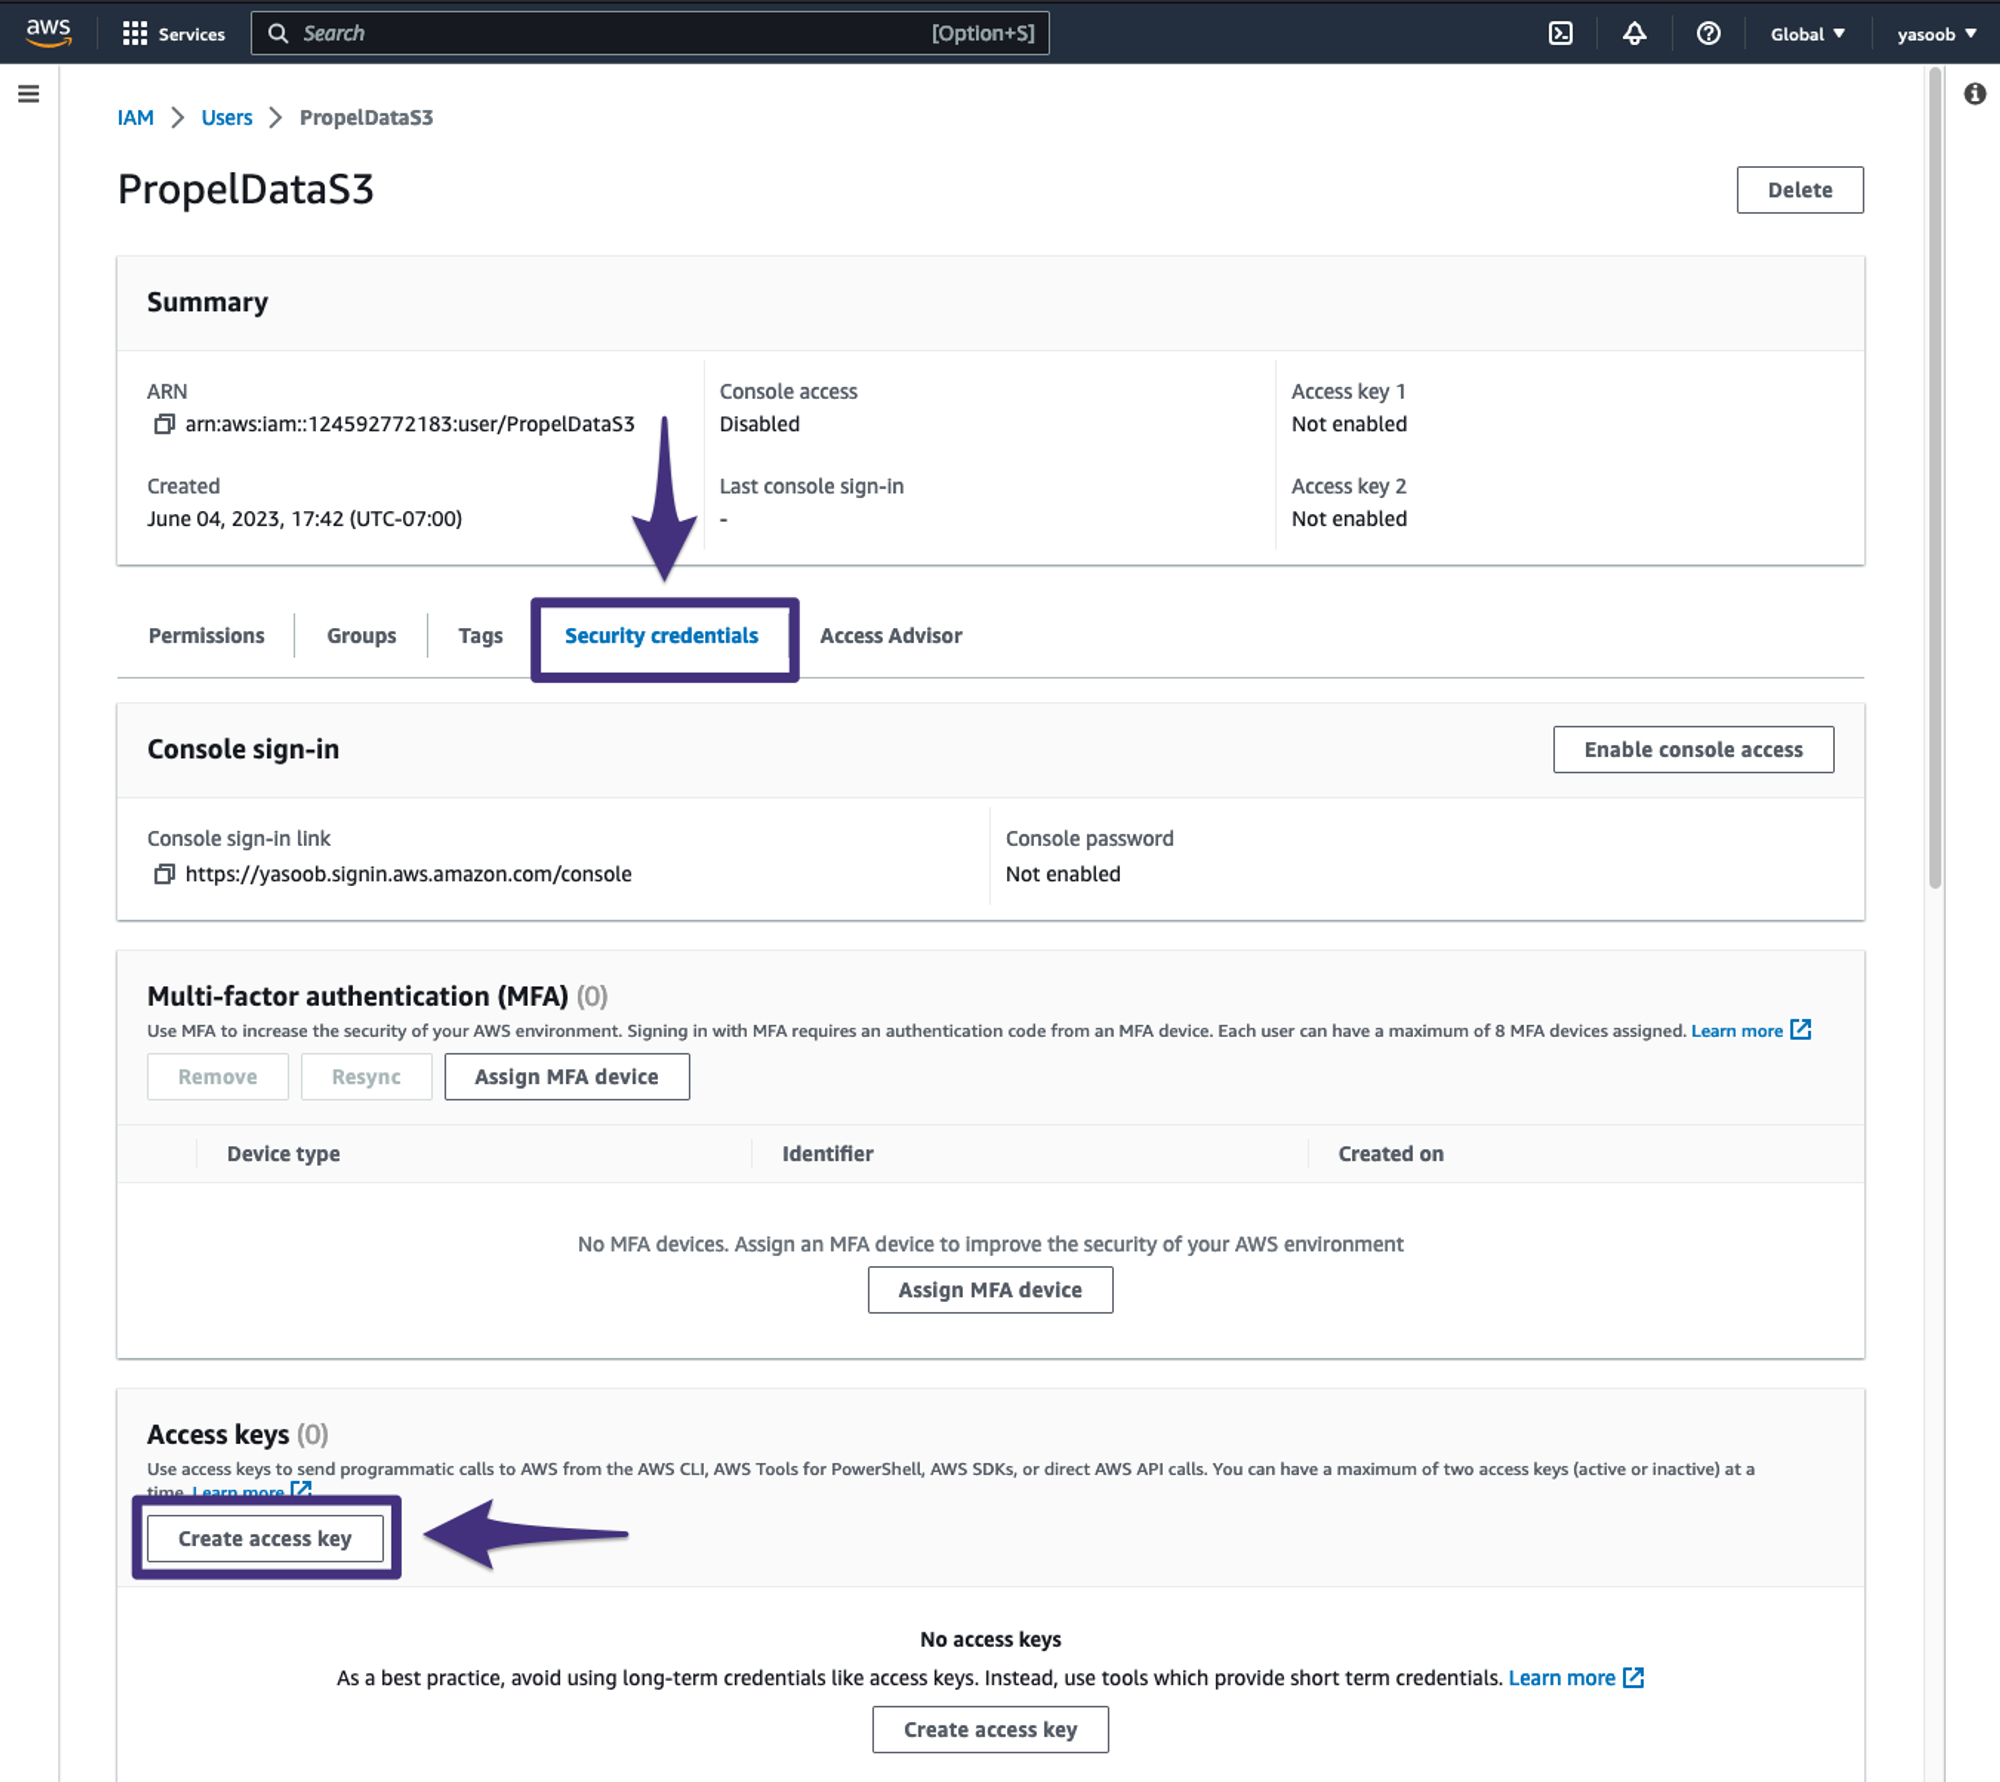
Generating Access Keys for the IAM User
Click the newly created user, navigate to the Security credentials tab, and click Create access key:
Select Third-party service and click Next:
.png)
Add a description and click Create access key:
.png)
You’ll now be able to see the newly generated Access key and Secret access key:
.png)
Make sure you copy and save these keys in a safe place, as you won’t be able to see the Secret access key again.
Click Done. You’re now ready to set up Propel.
Getting Started with Propel
If you haven’t already, go to the Propel website and create a new account:

Creating a New S3 Data Pool
Once you’re logged in, go to the Data Pools tab, then click Amazon S3.
.png)
Then, click Add new credentials.
.png)
Fill in the form with the AWS credentials, and click Create and test Credentials. Here, you can specify the path to the parquet files. To use all parquet files in the bucket, use **/*.parquet.
.png)
If successful, you should be able to see the CONNECTED status.
.png)
At this stage, you also have to define the schema. You can either define the schema manually or let Propel scan a Parquet file and infer the schema automatically. This tutorial uses the latter method. You should note that this method does not upload the file to Propel. The file is scanned in the browser, and only the inferred schema is sent to Propel.
Press Click to browse to select a Parquet file that Propel can infer the schema from:
.png)
Once Propel has successfully analyzed the schema, this is what it might look like:
.png)
Click Next.
.png)
Then set Primary timestamp to CREATED_AT and click Next.
.png)
Set the Data Pool’s unique name, and click Create Data Pool.
.png)
If successful, you should see the LIVE status.
.png)
The syncing can take a while, depending on how big your Parquet files are and how many of them you have in the S3 bucket.
Exploring the Playground
- Accessing the Playground: Navigate to the Playground tab from the left-hand sidebar. This area allows you to construct and test queries dynamically.
- Choosing the Data Pool: for the Data Pool section, choose the Data Pool you just created.
- Choosing Visualization Type: Select the type of visualization you want to create from the options on the left-hand side: 'Time Series', 'Counter', or 'Leaderboard'.
- Selecting Metrics in Queries: You have two options for incorporating metrics into your queries:
- Directly integrating a metric into the query. Options include <span class="code-exp">SUM</span>, <span class="code-exp">COUNT</span>, <span class="code-exp">COUNT DISTINCT</span>, <span class="code-exp">MIN</span>, <span class="code-exp">MAX</span>, <span class="code-exp">AVERAGE</span>, and <span class="code-exp">CUSTOM</span> for custom metrics.
- Using a predefined Metric. Select from the Metrics you have already set up.
.png)
5. Learning how to use the playground with <span class="code-exp">COUNT</span>
To learn how to use the playground, let’s use the <span class="code-exp">COUNT</span> metric here. Then follow these steps to refine your query:
- Time Range Selection: Choose between an absolute or relative time range. For illustration, let's select the last 5 years.
- Setting Granularity: Set the granularity of your data. For this example, use 'Week' as the granularity, sticking with the default options.
- Propeller Selection: Select the compute unit, known as Propeller, to process your query. Use the default option, which is <span class="code-exp">P1_X_SMALL</span>.
- Filtering: Add filters as desired.
- Running the Query: Click on 'Run Query' to execute your query.
- Then, you should see the query results. Check how that looks, as well as the corresponding GraphQL query displayed on the UI.
Creating an Application & set up authentication
After that, to power customer-facing analytics using the Data Pool you set up, you’ll need to set up an Application, generate an access token and learn how to make API requests using it.
To do this, you can follow this guide on how Propel authentication works.
Conclusion
In this tutorial, we've showcased the process of transforming raw Parquet file data stored in Amazon S3 into a structured and queryable format using Propel. By utilizing the combined capabilities of S3 for scalable storage, Parquet for efficient data organization, and Propel for dynamic API creation and query handling, we've simplified the management of a data lake. This approach significantly reduces the complexity and overhead associated with traditional data processing pipelines and ETL processes. With Propel, you gain rapid access to data, high-performance query execution, and robust multi-tenant security, ensuring that your data is both accessible and secure. As new data is added to your S3 bucket, Propel quickly synchronizes, making updated data available for your queries. This guide offers a foundational strategy for establishing a scalable, production-ready analytics pipeline. Begin exploring the extensive capabilities of Propel for your data management and analytics requirements today.